help_outline Skip to main content

ECA Logo Version 11 

Slideshow
Header Slideshow
Add Me To Your Mailing List

Ensign Sailing Forum

Early Ensign traveler schematic
Author Last Post

Mike-


Zeke's last reply made me re-read your original post and your reply. Let me see if I can help.


As Jon says, there was no traveler on the 1963 boats, although the drawings I have seen indicate that by 1964, Pearson was supplying a simple traveler track with two stopper slides. The bigger point is that no one here will have any insight into how your boat was set up after someone put in a traveler system between 1963 and 1980, if that is the information you are trying to glean from the forum.


Over the last 60+ years, these boats have been rigged many ways by many people for many purposes, so there is no one way of doing things. That's one of the charms of owning an Ensign. It can be a blank slate if you want.


If you are trying to do anything other than replicate the set up you inherited, Zeke makes the important point: It's critical to know how you intend to sail the boat because cruising set ups are different from racing set ups.


On the other hand, if you are just trying to restore functionality and to reuse parts that you have, the good news is that you only need to be looking for parts that control the side to side travel of the traveler car. Sometimes that is as simple as a springloaded pin on the car or a stopper slide being placed into a hole on the traveler track.


Usually though there is a pair of control lines attached to each side of the traveler that move it from side to side and then secure it in the desired position. Most typically, the siezed end of the line on each side is secured to some sort of fitting at the extreme end of the track, fed through a block or sheave(s) on the car and run back to a cleat of some sort, usually a cam cleat. They can be rigged for 2:1 purchase, 3:1 purchase, 4:1 purchase or (although I have never seen this on an Ensign), even a 6:1 purchase.


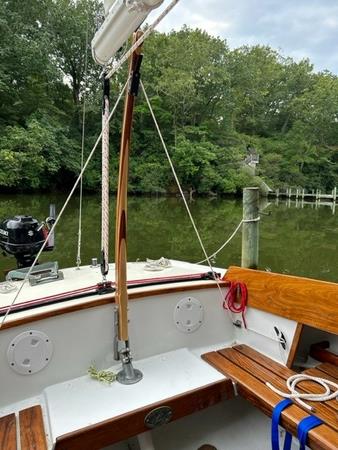
To illustrate a pretty simple modern system, please see the following photo of the 4:1 set up on my cruising Ensign. The terminal fitting on each end of the traveler track is a cam cleat, a system that is common on Ensigns.


The system is sometimes reversed, with control ends of the lines at the car, like this:

To illustrate how different a racing set up can be, here is Harken's diagram of a 3:1 system for more precise control by a racing crew:


That's the concept and some illustrations.


Send some photos and I am sure you will get a response specific to your boat. This is a very helpful community.


Stan Murphy

Nana 1658

Hartfield, Virginia


I don't have photos of my traveler, but will be going to do some work on Vulcan (#634) in the next several weeks and can send some then if you still need pics.

Vulcan has a continuous traveler line, with both ends feeding forward from the traveler to midships, cleated on port and starboard at the coaming, and tied in the center, with plenty of slack in the line. This allows the traveler to be actively trimmed by the mainsail trimmer from the rail, which is great for racing.

Basically, the mainsheet goes through a cleat on the boom, then aft to blocks (probably either 3:1 or 4:1) fastened to the top of the traveler car. The car moves along the track on the aft deck, as dictated by the traveler line, which is controlled by the main trimmer, usually from the rail. The traveler line feeds aft from midships, below the coaming and up through the deck at the ends of the traveler, which has blocks on each end and in the middle (again, I don't remember the ratio, but maybe 4:1 on both port and starboard). 

If the trimmer is sitting on the rail on the high (leeward) side, to lower the traveler in a puff, the trimmer just pulls to release the line that's cleated on the LOW (windward) side, then brings the car back up when the puff eases, by hauling on the continuous line and cleating it on the low side, all without leaving the rail. The car can also be raised above center as the conditions warrant. After 20+ years racing on main trim with this setup, I can't imagine any other setup!

Pat

I guess these will not post from my phone - will
Post later 

Sent from my iPhone

image0.jpeg

Does it look like this ?  I’m restoring 375… 

Here’s another pic starboard 

Rich 

image1.jpeg

Sent from my iPhone

Mike,

Photos would be great. Your system may have inherited problems that you might want to replace or modify now while you can.
But you never answered my question: do you race or will race it or Daysail it. 


Zeke


Hi Zeke and Jon,


Thanks for the comments, but I think there's a misunderstanding. The boat has a traveler installed - it was on the boat when I bought in 1980. It's an old style, with the track installed just aft of the aft end of cockpit, but still within the area with coaming on both sides. There are two lines that control the traveler car - one for each side. The line on each side runs from an eye strap that is secured to the coaming, aft of where the track is installed, then to the traveler car, back to a fairlead block that's attached to the coaming, and then down though a narrow cylindrical plastic tube with a slit - the slit is used to secure the line when the position of the traveler car is set. It's a bit clumsy, since you have to loosen the line on one side and secure the line on the other when you tack or jibe, but it does work. My question was where to attach eye straps and fairlead blocks; they were removed when I replaced the coaming, but I forgot to take a picture of the layout before removing them. Since this system was added sometime between when the boat was manufactured (1963) and when I bought it, apparently there's no schematic. I'll just work out a position for the eye straps and for the fairlead blocks that appears to work best. BTW, I don't race the boat - it's purely for day sailing.


Mike Mislove

Ensign 259

Madisonville, LA

One thing to remember is that the traveler and main sheeting system is the one system you will use every moment you use the boat and should be the one thing you spend the most money and time on so get a good one. 
Not the item to skimp on. 

Zeke

The 1963 version had no traveller.  It was a triangle rig with a center mounted cleat, behind the tiller.  Pretty much everyone abandoned this and went to travellers.

Zeke is right.  What do you want the handling to be, and what are you willing to spend?

Jon Simpson
E160
Lots of ways to run the traveler. How much do you want to spend and how much do you race? 

Zeke


Does anyone have a schematic for the traveler lines for an early Ensign? Mine is a 1963 version. The traveler is on a track just aft of the end of the cockpit, and inside the coaming. The lines that control it runs from eye straps fastened to the inside aft ends of the coaming to the trailer car, then back the coaming and down to plastic cylindrical tubes with slits - you pull the line tight inside the slit to secure it. Before replacing the coaming, I neglected to take a picture of the installation, and now I can't remember how it's set up. There is a fairlead block on each side to run the line from the traveler car to the stops. Thanks!


Mike Mislove

Ensign 259

Madisonville, LA

Return to Forum
Sponsor Number URL address
Sponsor 1 https://www.quantumsails.com/en/default
Sponsor 2 http://www.triadtrailers.com/
Sponsor 3 http://www.ussailing.org
Sponsor 4 http://www.northsails.com
Sponsor 5 http://www.spectrumphotofg.com
Sponsor 6 http://www.defender.com
Sponsor 7 http://www.ensignspars.com
Sponsor 9 http://www.patterson-marine.com
Sponsor 10 https://stores.coralreefsailing.com/ensign_class/shop/home
Sponsor 11 https://zbloksun.com/

ENSIGN CLASS Sponsors